When onboarding influencers, there are many tasks to handle—sending gifts, providing discount codes, affiliate links, dashboard credentials, shipping info, product delivery updates, first post follow up, payment reminders, etc. Managing all these tasks manually for each creator can be time-consuming and overwhelming.
That's where Activation Campaigns come in! They automate reminders and bulk communication based on specific triggers and conditions you set. These campaigns ensure a smooth, consistent process, saving you time and effort.
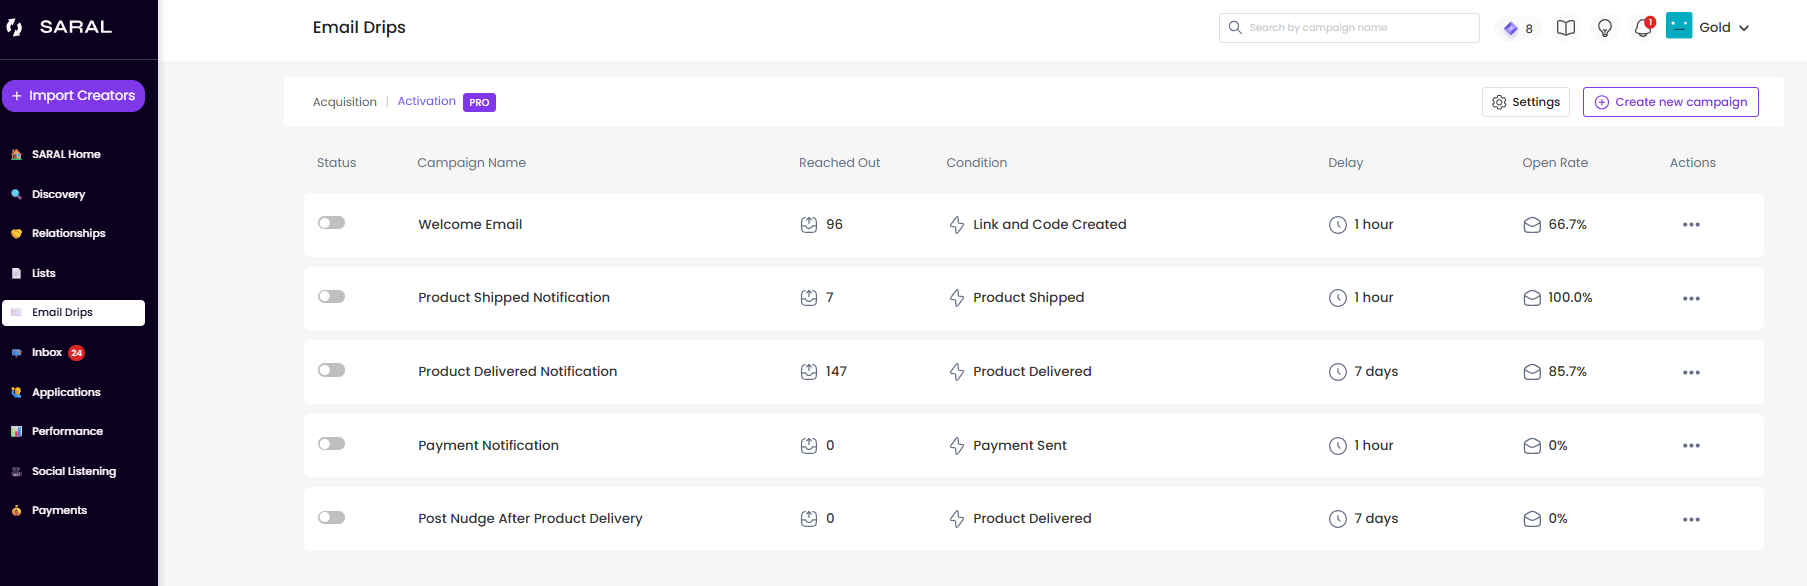
Go to the Email Drips tab in your dashboard.
Select Activation Pro.
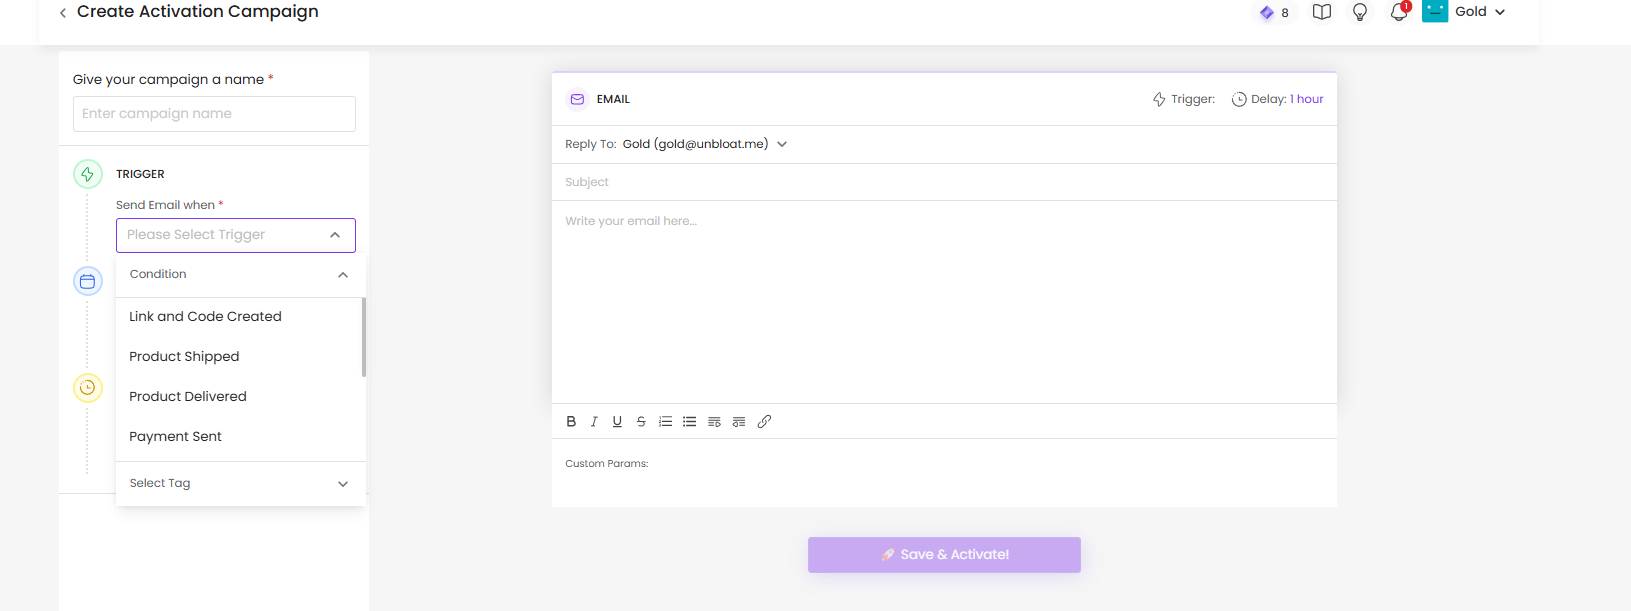
Click on Create New Campaign to get started.
From there, you can choose your email triggers, set up the schedule, and craft your message.
In SARAL, you'll discover pre-built email templates triggered by specific conditions:
Welcome Email: Sent after onboarding an influencer. Includes their discount code and tracking link to start promoting.
Product Shipped: Triggered when a product is marked as shipped. Includes the ETA and tracking link so the influencer stays informed.
Product Delivered: Sent once the product is delivered. Encourages the influencer to share unboxing or feedback.
Post Nudge After Product Delivery: Sent after delivery to remind influencers to post on social media.
Payment Notification: Automatically sent after a PayPal commission is transferred, notifying the influencer of their payment.
Types of Triggers for Activation Campaigns:
Condition Triggers: These triggers activate based on actions within SARAL, helping you move influencers through the post-onboarding process. Examples include:
Link and Code Created
Product Shipped
Product Delivered
Payment Sent
First Order
First Post Logged
First $X in Sales
Tag Triggers: These triggers launch emails based on the tags you assign to influencers. For example, if an influencer hasn’t posted yet, you can tag them with "Not Posted Yet" and set up a reminder email to launch two days after tagging.
You can choose when each of these activation emails should be sent after their respective conditions are met. For example:
For Welcome Email, Product Shipped, and Product Delivered, we recommend setting the delay to 1 hour after the trigger occurs.
For Post Nudge, a common setup is 5 days after product delivery.
These are just suggestions—you have full control over the delay settings when creating each campaign. Choose what works best for your workflow!
Additional Triggers You Can Set up:
First Order: Triggered when an influencer's follower makes their first purchase using their affiliate link.
First $X in Sales: This trigger is based on a set sales amount and is sent after the influencer reaches that threshold.
Link Only Created: Sent when only an affiliate link is created.

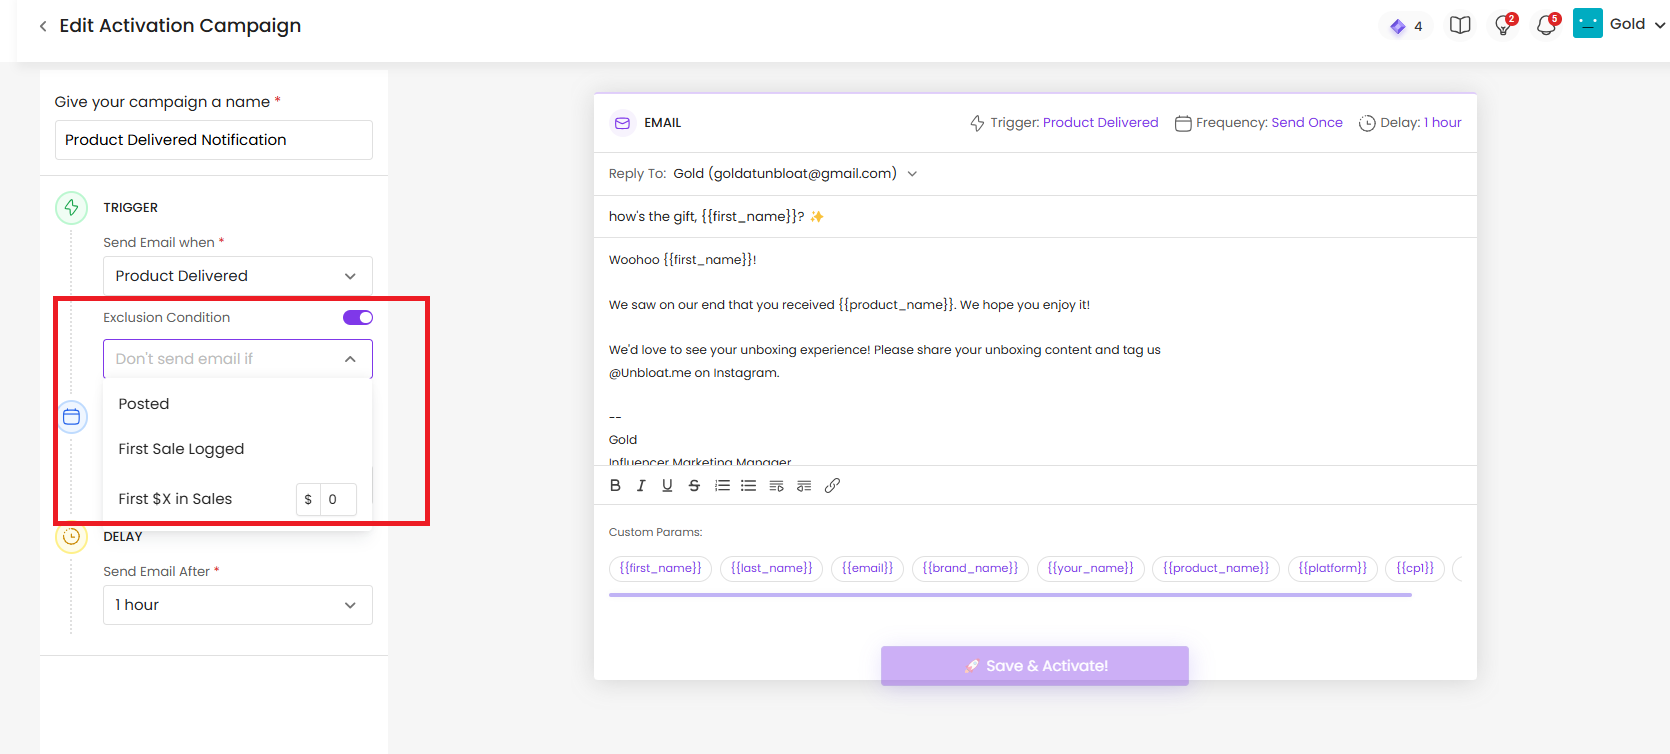
Managing activation campaigns just got easier! Now, you can exclude specific conditions to ensure your "Product Delivered Notification" emails are sent only to the right influencers.
💡By default, the Product Delivered email is automatically sent once a product is marked as delivered to an influencer. But now you can exclude influencers who:
Have Already Posted
Logged Their First Sale
Reached Their First $X in Sales
To set it up, follow these steps:
Go to Email Drips >Product Delivered Notification.
Under Trigger, choose Product Delivered.
Toggle on Exclusion Condition.
Select the conditions you want to exclude.
Save your changes.
Sending an email too soon or too late can significantly impact the success of your influencer campaign. That’s where SARAL’s custom delay feature comes in. With this functionality, you can control exactly when each email goes out — whether it’s 1 hour, 3 days, or a custom number — so your messages hit inboxes at just the right moment.
By timing your emails, you can prevent overwhelming your influencers with too many emails at once, offering a more thoughtful and less intrusive experience.
Want to keep certain influencers or entire lists out of your activation campaigns?
Here's how:
Go to Email Drips > Activation.
Click the Settings button on the top right.
Choose your exclusion type:
Exclude a List – Prevent all influencers in a specific list from receiving activation emails.
Exclude Influencers – Manually select individual influencers to exclude.

No more unwanted emails to those specific influencers or lists. Easy as that!
Still have questions?
Reach out anytime via the support chat at the bottom-right corner of your dashboard, or email us at [email protected]. We’re happy to assist!