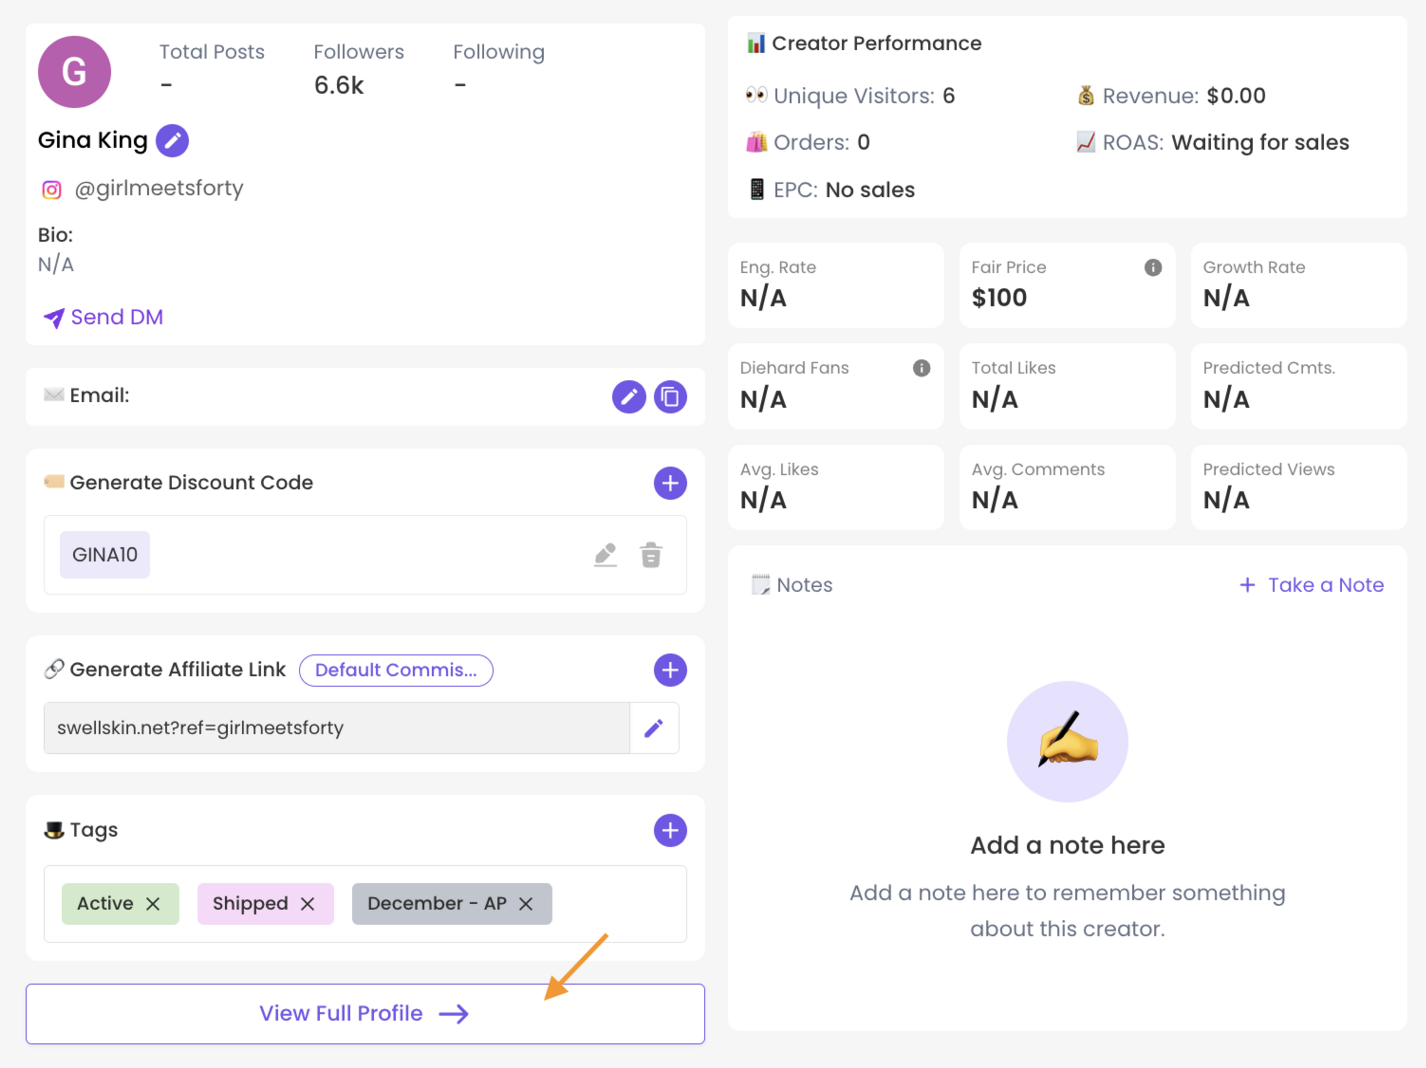
The influencer profile page serves as a central hub for storing all information about an influencer and tracking your brand's interaction history with them. Here, you can access the influencer's personal details and connect with them through various channels such as email or direct messaging. Additionally, you can manage your brand's operations with the influencer by generating discount codes, tracking links and shipping products.
Once you’ve added an influencer to a list, there are two ways to access their profile:
From a List View: Click on the influencer’s name
From the Relationships Board: Click on their card
This will open a mini profile view, where you can take quick actions. To access the full profile and view all available features, scroll to the bottom of the mini view and click “View Full Profile.”
Here’s what the full influencer profile page looks like 👇
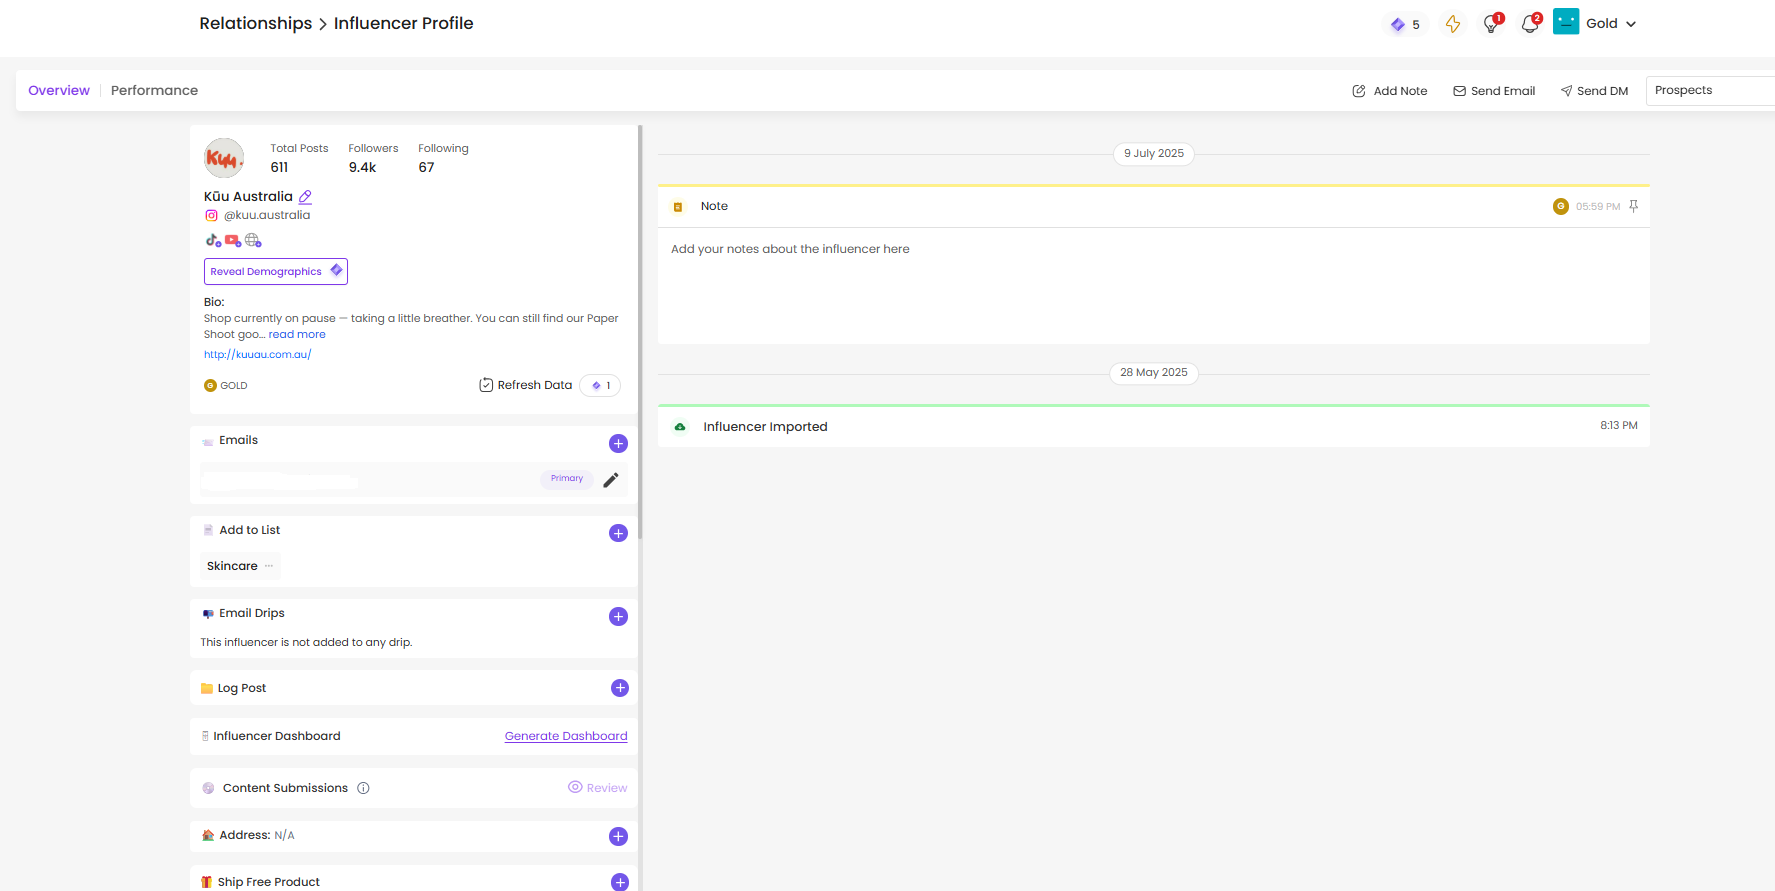
Notes are a helpful way to store important context about your influencers, so you don’t have to dig through email threads later. Use notes to capture details like:
Collaboration preferences
Agreed-upon fees or posting timelines
Sizing or shipping info
PDF attachments (e.g. contracts or briefs)
You can also pin important notes to the top of the email panel on the right-hand side of the profile, ensuring key info is always visible to you and your team.
Tasks work as reminders for any action you need to take related to the influencer - whether it’s following up, checking in on a post or sending a product.
You’ll find the task section on the left-hand side of the profile, where you can create, assign and schedule reminders. SARAL will notify you when a task is due, so nothing falls through the cracks.

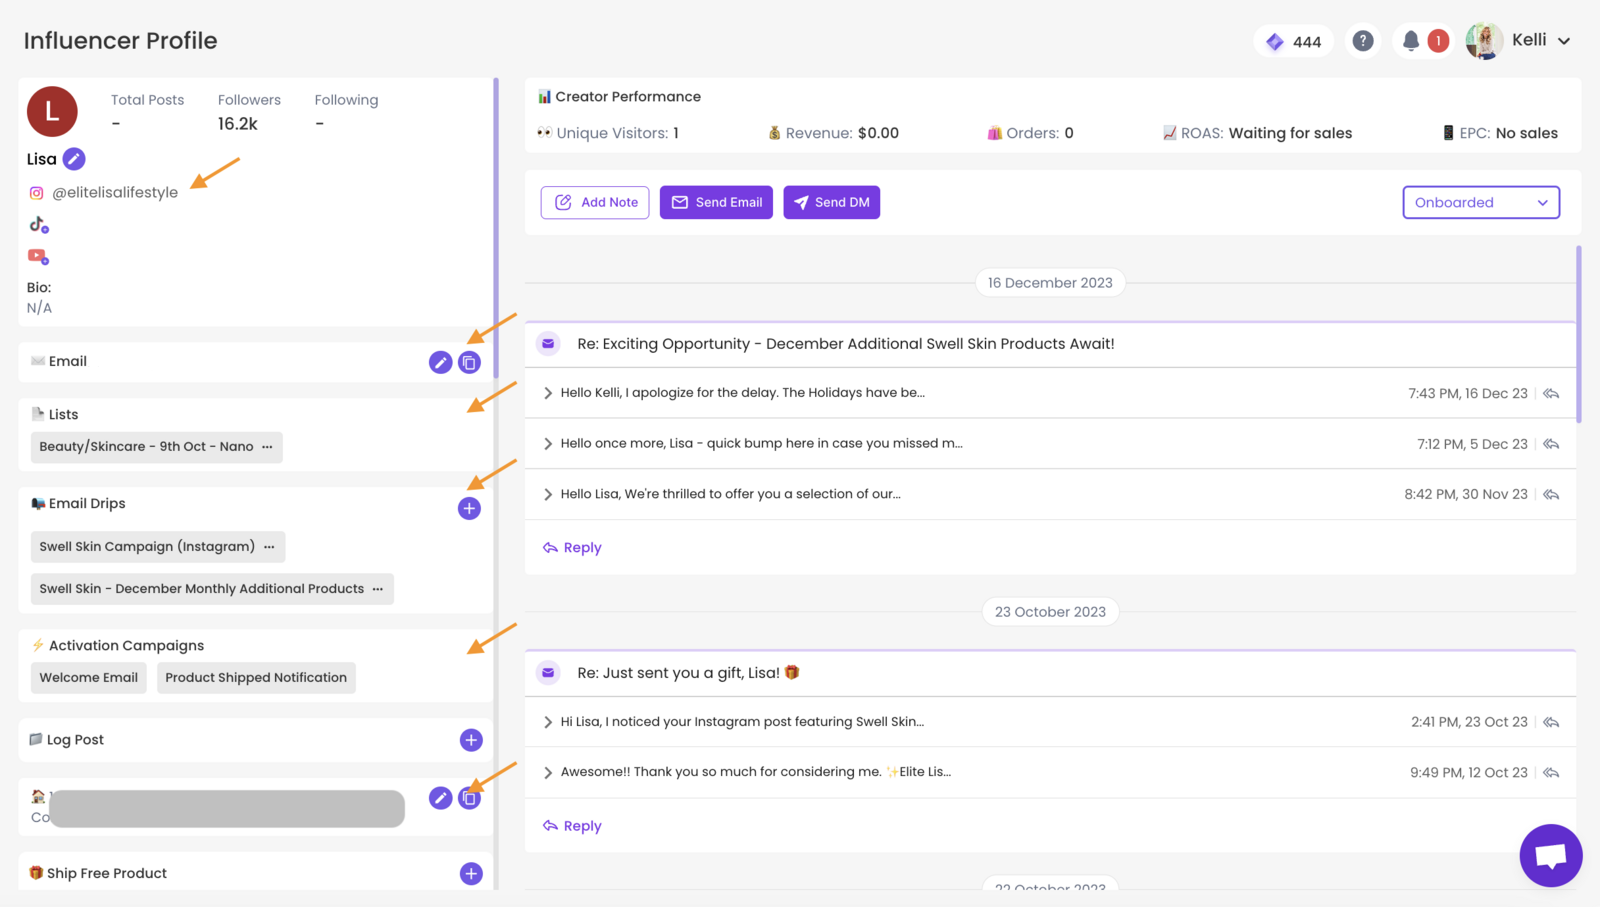
Send an email: Clicking the "Send Email" button on the right-hand side of the influencer’s profile to send a one-off email directly from your connected Gmail account. You’ll also see your full email history with the influencer in the same section, making it easy to track past conversations at a glance.
Send an Instagram DM: Use the “Send DM” button to open the influencer’s Instagram profile and quickly send a direct message. This is ideal for short updates or more informal outreach.
The right-hand panel of the profile also serves as a central hub for relationship tracking. It shows a timeline of all key actions and interactions, so you always have context on where things stand.
You’ll be able to view:
When discount codes and affiliate links were generated
When the influencer was onboarded
Which email drips they’ve received
Products gifted or shipped
Logged social posts and mentions
Notes or updates from you or your team
This timeline helps your entire team stay aligned and ensures no detail is missed across the collaboration.

From this profile view, you can easily update the influencer’s personal information, such as:
Email address
Phone number
Shipping or billing address
To view an influencer’s social data and audience insights, click the “Reveal Demographics” button located just below their name and social media handle.


Note: Revealing influencer demographics will consume Ratnas, so use this feature when you’re seriously considering working with the creator.
Once an influencer has agreed to collaborate with your brand via email, it’s time to officially onboard them. This can be done directly from their profile by completing three key actions:
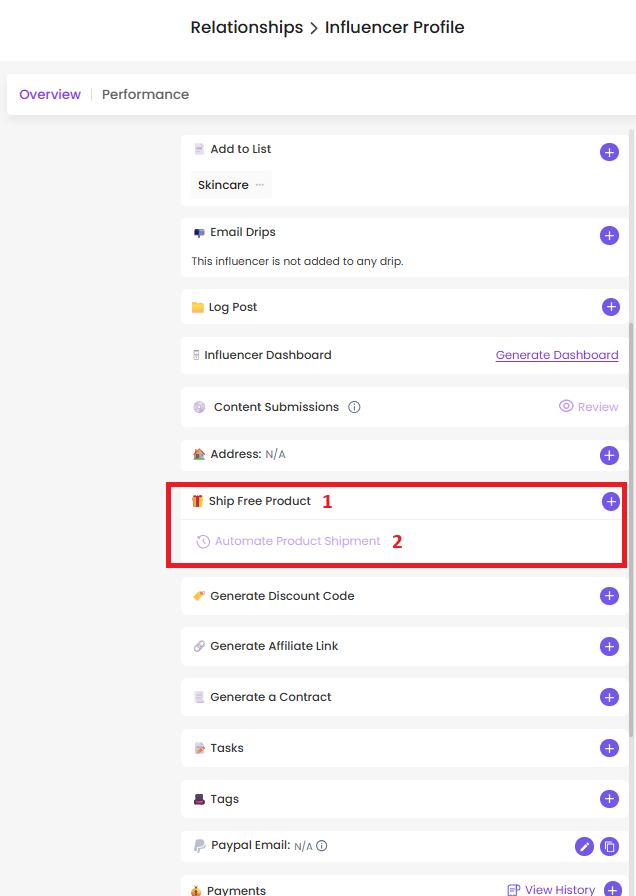
Shipping a Free Product
Generating a Discount Code
Generating an Affiliate Link
1.1 —To ship a product from the influencer’s profile plus details on the automated shipping feature. Here’s how:
How to ship free product to influencers?
How to ship free product to influencers?
Note: All orders shipped through SARAL are tagged as “SARAL ORDER” and will appear with a $0 value in your Shopify store to ensure they’re clearly marked as gifted items.
1.2— Generate Discount Codes & Affiliate Links
Once you’ve shipped a free product to the influencer, the next step in onboarding is to provide them with a Discount Code and an Affiliate Link. These allow them to promote your product with incentives while giving you clear tracking on performance, all directly from their SARAL profile.
First: Set Up Your Templates (One-Time Step)
Before you can generate discount codes or affiliate links, you’ll need to create your templates in Settings. This ensures consistency across all collaborations. Here’s how:
Setting up Discount Code Templates
SARAL connects to your store and enables generating discount codes seamlessly. Discount Code Templates are a way for you to generate codes instantly, without having to come up with a code name every time.
Creating Commission Tiers in SARAL
Creating and Updating Commission Tiers in SARAL
Second: Generate Code and Link
Once your templates are created, you’ll be able to generate codes and links in just a few clicks. Follow the guide below to get started:
How to Generate Affiliate Links and Discount Codes
How to Generate Affiliate Links and Discount Codes
Reach out anytime with our helpful Support team using the button at the bottom-right corner of your dashboard, or email us at [email protected].