You can access your Relationships board by clicking on “Relationships” in the left-hand sidebar.
If you haven’t saved influencers yet, your board will be empty. To get started, save influencers from the Discovery tab or by using the Chrome extension.
Your Relationships board helps you track influencers through 5 natural stages:
Prospects: Influencers that are saved but haven’t reached out to yet.
Reached Out: You’ve sent them a message—now waiting to hear back.
In Conversation: They’ve replied, and you’re currently chatting or negotiating.
Onboarded: You have worked out a successful collaboration!
Rejected: Not every influencer is a fit, and that’s okay. These are the ones who declined or didn’t work out.
Stage customization is available, so you can tailor your board to match your workflow. Whether you're building a seeding funnel or a custom outreach pipeline, you can:
Create custom stages to reflect your exact process
Set automatic stage update rules to move creator cards between stages based on specific actions (e.g. email replied, contract signed)
 For step-by-step instructions on setting this up in your Settings, please refer to this article:
Customize Your Relationship Board View
Customize Your Relationship Board View
You can always drag and drop influencer cards between stages manually — but SARAL does it automatically to save you time.
Here’s how it works:
Prospects: When you save a creator, they start here.
Reached Out: Once you add them to an email campaign, they’re automatically moved to this stage.
In Conversation: As soon as they respond to your email, they’re moved here.
Onboarded: If you ship a product or generate an affiliate link for them, they’ll move to this stage.
Rejected: You can move them here manually if the collaboration doesn’t move forward.
This automation helps you stay organized without extra effort.
You can filter your Relationships board in four ways to quickly find the influencers you need:
Filter by List
Filter by Tags
Filter by Delivery Status
Filter by Commission Tier
1 — Filter by List
At the top left of your Relationships board, you’ll see a dropdown menu (usually labeled “All” by default).
Click this dropdown to filter your view and display creators from a specific list only.

2 — Filter by Tags
Tags are a great way to segment your influencers based on their type, collaboration status, or any other custom criteria—like “Contract Sent” or campaign category. You can use tags to organize your influencers however it makes sense for your workflow.
To filter by tags:
Click “Show Filters” at the top right of your Relationships board.
Select the tag(s) you want to filter by.
You can choose one or multiple tags to narrow your results.

3 — Filter by Delivery Status
Right below the Tags option under “Show Filters”, you will see “Delivery Status”. Click on it to filter your influencers based on their shipment delivery status.
This is particularly useful when you want to follow up with influencers who have already received their products.

4 — Filter by Commission Tiers
You can filter your list view by influencers commission tiers that you’ve assigned them.
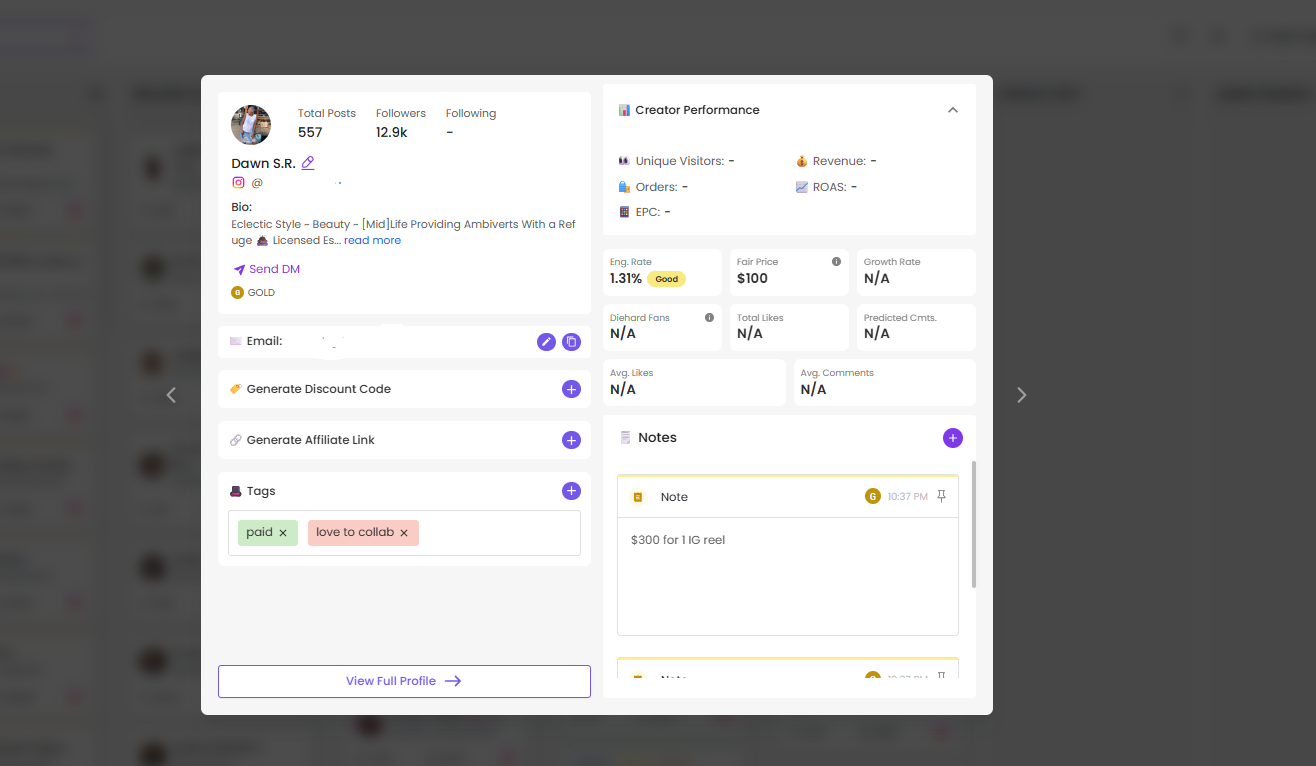
Let’s talk about the individual creator cards. Not only can you drag and drop them between stages, but you can also click on the cards to open a preview of their profile.
When you click on a card, it opens up a preview that displays key details and allows you to take basic actions:

On the left side of the creator quick view, you’ll see key details such as their profile picture and bio. You can also:
Visit Full Profile
Click “Send DM” to send a direct message on Instagram
Edit their name and email if needed
Additionally, you can perform a few key actions directly from the quick view:
Generate a Discount Code or Affiliate Link: Create or copy links directly from this panel.
Add Tags: Quickly tag their profile for easier segmentation later.
Take Notes: You can add quick notes to remember important details about the creator.
If you click on “View Full Profile”, it will open up the creators full profile. Learn more about that below.
Influencer Profile Page 101 - The Basics
The Basics
Still have questions?
Reach out anytime via the support chat at the bottom-right corner of your dashboard, or email us at support@getsaral.com. We’re happy to assist!